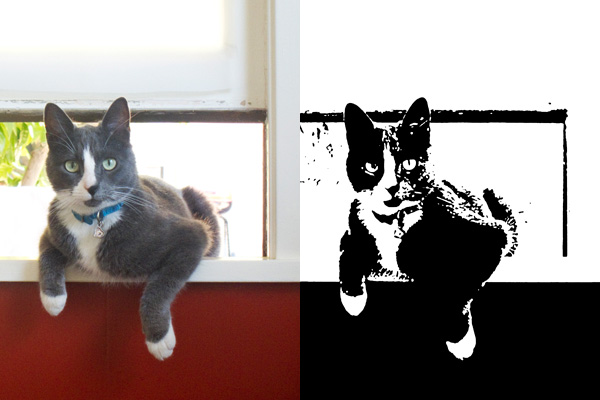
Analyzing the Processing of Screen Printing with a Stencil
January 29th, 2013 By The Artist Formerly Known as KateFor a period of a few years in the mid-2000s, I made and sold craft clothing items. I wanted to learn about screen printing, but the need for emulsion and other chemicals seemed too complicated, so I started making my own stencils.
Cultural Considerations
The look of stencils is usually a bit rougher and more “amateur”-looking than screen prints. There are also some connotations with homemade activist clothing (i.e. the ubiquitous Che Guevara shirts) and posters, as well as graffiti. It’s a craft for people who don’t want their final object to look clean and professional and who want the ability to make a series of prints.
Prior Knowledge
Although I learned the basics of screen printing in a high school art class, I taught myself how to make stencil prints by using internet tutorials and trial and error. I’ve never personally seen another person perform this process. People new to this process will inevitably make errors when designing the stencil because all of your “negative” space must be connected (in each single color process). Because I’ve done this many times, I’ve learned to carefully analyze my design before I start cutting because repairs are difficult.
Goal/Need
Since I no longer sell my crafts, my current goal would be to make myself a print or clothing item. I could choose my subject based on my personal likes or to express an opinion. If I don’t have to sell a print, the standards will be a bit lower, as I am probably more accepting of imperfections and mistakes if I’m not charging money.
Umbrella Plan
Finances: Finances are rarely a consideration, since stenciling is a very inexpensive craft, costing only a few dollars per item.
Materials: Paint (varies based on what is being printed), plastic, a good Exacto knife. These are supplies I keep on hand and are easily obtained.
Skills: The most important skill in this process is the design (considering positive and negative space) and the ability to make fine cuts through the plastic with the knife. The paint application requires almost no skill.
Standards: Although my own standards are probably not as high as the “craft community,” I would still attempt to create something that looked good enough to post/share online. Looking at the work of others and comments from the community would inform my perception of quality.
Begin crystallizing
Decisions: There isn’t a lot of room to change decisions once you start cutting, so the design process is critical.
The first step is decide on an image that will lend itself to a high-contrast (black and white) conversion. Because of applications like Photoshop, it’s easy to test out different images. I need to analyze if there are “floating” negative spaces that I would need to connect in my stencil. If I’ve chosen a good image and made the necessary alterations, the stenciling process will be much easier.

Next, I print my image and begin cutting out the black areas with my knife. This part of the process requires the most manual dexterity, but not much decision-making. I’ll need to make decisions if I’ve made a mistake in the design process (or if I’ve made a mistake with the knife). If there’s a “floating” area that I’ve missed or a weak connection, I’ll need to figure out and attempt a fix. I might need to start over with the design process.
Evaluations:
There are usually two points of evaluation:
1. After the image has been printed (does it look right in black/white contrast? Is it still identifiable? Will it be too difficult to cut?)
2. After I’ve applied paint and removed the stencil. This is the last step of the process, so if I’m not happy with the way it looks, I need to determine if it’s a design flaw, a poorly cut stencil (i.e. jagged edges), or the paint seeping under the stencil. In this case I would use the “academic standards” to determine whether I will need to start again (from the beginning or from a later step in the process).
Final analysis/thing
Once I’ve completed the process until I’ve “passed” the evaluation, I’ll have a stenciled item (and a stencil that can be used many more times).

