Author Archive

Cutting Stencils with Cookie Dough

Wednesday, February 6th, 2013

The “feel” for stenciling is best exemplified through the cutting process. While the design is certainly an important part of the craft (and experience helps determine what is “cut-able” and what isn’t), the act of slicing the plastic with an Exacto knife is what requires some real manual dexterity. It’s the part you really need to just “do” for awhile until you figure out the best approach. You learn what kind of curves you can do in one stroke, which areas to tackle first, and how to create corners.

To recreate this experience, I thought about other activities that involve some kind of tracing or complicated line following. I was inspired by our trip to the craft center. Rolling out the clay reminded me of rolling out cookie dough. I thought about what it would be like to freehand cut sugar cookies (rather than using a cookie cutter to stamp them out). I think there are some similarities to plastic (hard plastic/hard dough cracks more easily, soft plastic/dough cuts too easy, doesn’t keep shape).

I wanted to experiment with different cutting tools to find the right level of difficulty. It shouldn’t be too easy to cut the dough. It should be very difficult to turn sharp corners. Pulling the cut dough away from the rest should also be slightly challenging.

Overall, much like cutting a stencil, it seemed like any of these tools could have worked if I spent the time to practice. Like stenciling, the sharpest implements cut best, but also allowed me to make mistakes more easily.

Preparing the dough and tools:


Attempting cuts with various tools:


Pairing Knife


Pairing knife didn't work out so well...

Sharp Chopstick

Small Spoon

Attempt with plastic butter knife


The big gun(s): Chef's Knife


Analyzing the Processing of Screen Printing with a Stencil

Tuesday, January 29th, 2013

For a period of a few years in the mid-2000s, I made and sold craft clothing items. I wanted to learn about screen printing, but the need for emulsion and other chemicals seemed too complicated, so I started making my own stencils.

Cultural Considerations

The look of stencils is usually a bit rougher and more “amateur”-looking than screen prints. There are also some connotations with homemade activist clothing (i.e. the ubiquitous Che Guevara shirts) and posters, as well as graffiti. It’s a craft for people who don’t want their final object to look clean and professional and who want the ability to make a series of prints.


Prior Knowledge

Although I learned the basics of screen printing in a high school art class, I taught myself how to make stencil prints by using internet tutorials and trial and error.  I’ve never personally seen another person perform this process. People new to this process will inevitably make errors when designing the stencil because all of your “negative” space must be connected (in each single color process). Because I’ve done this many times, I’ve learned to carefully analyze my design before I start cutting because repairs are difficult.


Goal/Need

Since I no longer sell my crafts, my current goal would be to make myself a print or clothing item. I could choose my subject based on my personal likes or to express an opinion. If I don’t have to sell a print, the standards will be a bit lower, as I am probably more accepting of imperfections and mistakes if I’m not charging money.

Umbrella Plan

Finances: Finances are rarely a consideration, since stenciling is a very inexpensive craft, costing only a few dollars per item.

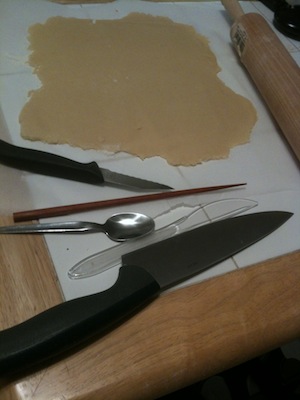
Materials: Paint (varies based on what is being printed), plastic, a good Exacto knife. These are supplies I keep on hand and are easily obtained.

Skills: The most important skill in this process is the design (considering positive and negative space) and the ability to make fine cuts through the plastic with the knife. The paint application requires almost no skill.

Standards: Although my own standards are probably not as high as the “craft community,” I would still attempt to create something that looked good enough to post/share online. Looking at the work of others and comments from the community would inform my perception of quality.

Begin crystallizing
Decisions: There isn’t a lot of room to change decisions once you start cutting, so the design process is critical.

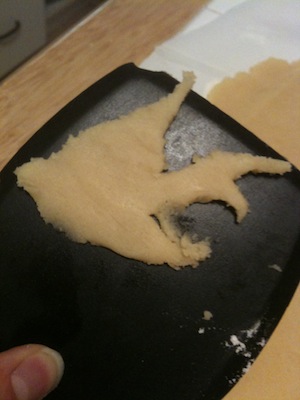
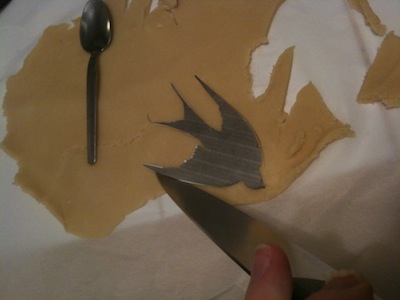
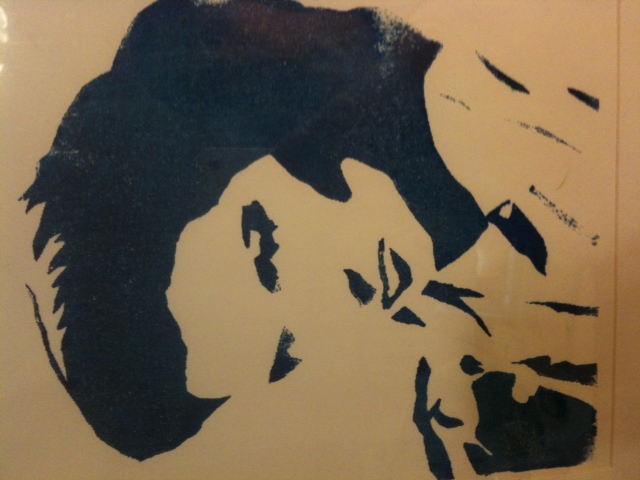
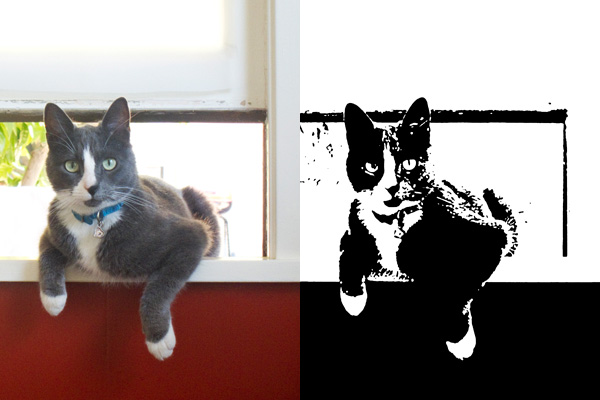
The first step is decide on an image that will lend itself to a high-contrast (black and white) conversion. Because of applications like Photoshop, it’s easy to test out different images. I need to analyze if there are “floating” negative spaces that I would need to connect in my stencil. If I’ve chosen a good image and made the necessary alterations, the stenciling process will be much easier.

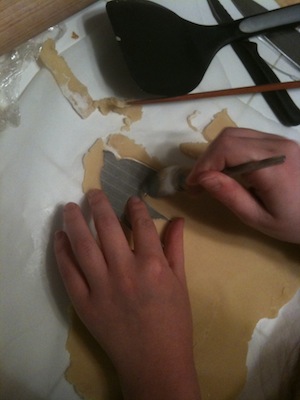
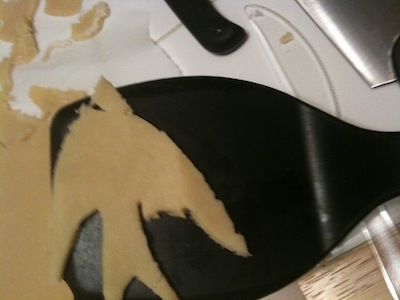
Next, I print my image and begin cutting out the black areas with my knife. This part of the process requires the most manual dexterity, but not much decision-making. I’ll need to make decisions if I’ve made a mistake in the design process (or if I’ve made a mistake with the knife). If there’s a “floating” area that I’ve missed or a weak connection, I’ll need to figure out and attempt a fix. I might need to start over with the design process.

Evaluations:

There are usually two points of evaluation:

1. After the image has been printed (does it look right in black/white contrast? Is it still identifiable? Will it be too difficult to cut?)

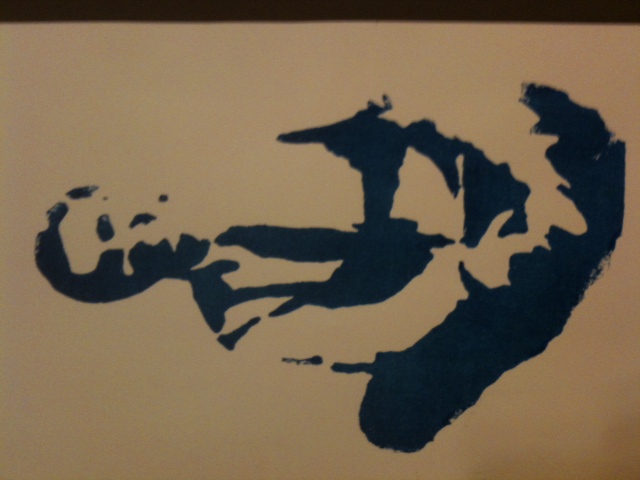
2. After I’ve applied paint and removed the stencil. This is the last step of the process, so if I’m not happy with the way it looks, I need to determine if it’s a design flaw, a poorly cut stencil (i.e. jagged edges), or the paint seeping under the stencil. In this case I would use the “academic standards” to determine whether I will need to start again (from the beginning or from a later step in the process).

Final analysis/thing

Once I’ve completed the process until I’ve “passed” the evaluation, I’ll have a stenciled item (and a stencil that can be used many more times).


Anti-Deskilling Quilting

Monday, January 28th, 2013

The purpose of this kit is to allow for maximum creative control, while using the affordances of computer software to aid in the design process. Making the top of a patchwork quilt with squares of fabric requires little sewing skill. Essentially, the quiltmaker simply sews a series of straight line to join each square in a row, and then join the rows together. For that reason, I have not made alterations to the actual construction process.

The real craft of making a patchwork quilt is the design process: selecting fabrics and creating a pattern (simple or complex) to complement the color and print. The pattern making process includes determining the sequence, size and shape of the fabric squares. For this reason, this kit would include more fabric squares (in a wide variety of colors and prints) than necessary. Since the creation of the pattern is what I consider to be the critical skill in quilting, it would not be provided to the user. Simple directions would be provided to explain the construction process, but not a specific sequence of squares.

The digital component in this kit is provided by a software program that assists the user in the creation and alteration of the pattern. The analog design method would be to use graph paper and colored pencils. It’s a fine method, but difficult to make changes, experiment, and get a good sense of the finished product with simple markings. With the computer, the quilter could scan or photograph fabric swatches, creating digital fabric squares that are true to life. The program could use algorithms to generate symmetrical designs based on several rows designed by the user. With a few simple clicks, multiple squares can be swapped and changed, making the design process much faster.


Joint Relationships

Wednesday, October 10th, 2012

Inspirations:
On our call, Elizabeth Giron emphasized the importance of problem solving in the choreography process.  She referred to it as a “verbal problem turned into a movement problem.”
Two components of “Force of Circumstance” inspired this proposal:

  • making movement accumulate (as Elizabeth demonstrated with her S phrase).
    • The accumulation aspect reminded me of a looper, a device usually used for music and sound design. Loopers have been adapted to video for use in dance performances (Movement Looper at MIT or Dance Loops at Utah Valley University)
  • spatial counterpoint
    • Sean Curran’s emphasis on clean lines, body shape and linearity  reminded me of an animation made for Issey Miyake’s APOC collection in 2007 (http://www.youtube.com/watch?v=x4_mK9CebB4). The animation is a loop of 3D tracking data from a walking model.  Her joints are represented by white dots on a black background, with lines occasionally joining the dots in a variety of patterns, some resembling shapes of the body and Issey’s clothing, some more abstract.

This digital intervention would combine looping with minimalist skeleton tracking.

Setup:
Kinect and Laptop with skeleton tracking application that can map at least 13 points/joints
Projector
Wireless device (worn by dancer to start and stop recording a loop)

Process:
The dancers’ movements are tracked with dots, using the tracking application:

The dancers can start and stop recording a loop with a wireless device. Using the laptop, lines can be drawn, connecting dots within one dancers “skeleton,” or the lines can connect the same joint on multiple dancers.


Since Sean is “a hawk for detail” and gives much consideration to line and shape, I wanted to give him and his dancers a platform to highlight his choreography. By turning the dancers’ bodies in points and lines that can be reshaped and manipulated, the technology provides thousands of relationships between parts of one body and parts of many bodies. It’s a new kind of exploration of body shape and movement.

Deep Breath Music

Wednesday, September 19th, 2012

A SKILL OR PLAY PROCESS WE ALL SHARE

Breathing is process both automatic and conscious. Though we can hold our breath for a period of time, humans, literally, can’t help but breathe eventually. It’s a basic bodily function and almost completely universal.

Deep breathing from one’s diaphragm is a skill. Yes, you can get better at breathing. Meditation is called a “practice” for a reason. Everyone can participate in this activity because everyone can breathe; however, some might be more skilled deep breathers who are able to manipulate the process of music making.


EXPLOITED IN A WAY THAT THE ACTIVITY BECOMES PRODUCTIVE

In “Deep Breath Music” the user stands in front of clear glass and a theremin-like device with photoresistor (and possibly other sensors), such as a Beep-It. The Beep-It emits a high-pitched tone when the sensor is exposed to bright light. When you block the light by moving your hand in front of the sensor, or tilting the Beep-It away from the light source, the tone gets lower. A button on the side allows you to turn the sound on and off so that you needn’t slide from note to note.

Waving a hand in front of the sensor reminded me of blinking, which, in turn, reminded me of the similarly automatic process of breathing. By breathing onto a pane of glass in front of the Beep-It, the user will create a temporary opacity that will block some of the light from the sensor, lowering the tone.  In theory, the user should be able to create music (of some sort), just by breathing. The system could be enhanced with more sensors, perhaps measuring temperature (warm breath on a cold surface) or humidity or even wind.

Because the range of tones would be fairly limited, you would need more than one user to create sounds resembling a melody. A hand bell choir would be a good analogy. If each of six or seven user had their own Deep Breath Music setup, with a slightly different light source, they could work together to make music, instead of simple beeping sounds, just by breathing onto panes of glass.

Let’s Get Lost: Redesigning the GPS Process

Monday, September 17th, 2012

GPS devices for personal use usually help us figure out how to get somewhere we want to go. With a few simple additions, GPSs can get us lost and take us to someone else’s favorite place. This concept would be an optional modification to a GPS device, using existing technology. Instead of inputting a desired destination, users would rely on custom navigation and recorded narration from local cab drivers (in this example), directing them to a place they’ve likely never been.

Inspired by TaxiGourmet (http://www.taxigourmet.com), I envision using GPS devices as a communication system for taxicab drivers (and other “locals”) to lead other drivers to their favorite restaurants and out-of-the-way places.

  1. Using an external microphone with the GPS in his own car, Joe the taxicab driver records a narrative as he drives to his favorite restaurant. The mic records his voice, while the GPS records the car’s movements.
  2. Once he arrives at the destination, he uploads the narration and directions.
  3. Two weeks later, the Smith family is jonesing for some kimchi. They hop in the car and start typing in the address for their favorite Korean restaurant, when little Johnny Smith suggests using the “Let’s Get Lost” hack on their GPS. They leave their fate up to a random set of directions from a stranger. The Smiths are adventurous folks.
  4. The GPS device directs them to the starting point of the cab driver’s directions. Once they hit the starting point, Joe’s narration kicks in, leading them to a mysterious location that will not be revealed until they reach it.
  5. Twenty minutes later, the Smiths reach Joe’s favorite West African restaurant. There’s no kimchi on the menu, but they’ll find something new to try.

Let’s Get Lost is more about redesigning a process than physically redesigning the GPS hardware. This system would probably require an external microphone (already available on Garmin devices), possibly a SIM card (to streamline the process and avoid having to plug the GPS into a computer to upload), and some kind of web interface/app. It’s simply reappropriating a device that’s designed to get you to the “right” place in the more direct way. Users would be forced out of their local comfort zones and left at the mercy of a stranger, just as if they asked a cab driver to take them to his favorite restaurant.

Messing about with Macaroni Necklaces

Sunday, September 9th, 2012

After playing around with origami as a possible “messing about” activity, I decided that it was too dependent on following a specific set of instructions. Group members would be forced to follow written directions closely, or listen to one speaker demonstrating each fold. Something so based in following directions might not be the best way to stimulate conversation. Plus, origami isn’t nearly messy enough.

Macaroni necklaces share some key traits with the inspiration activity of knitting

  • Both are solitary activities that can be performed in the company of others (or cooperatively)
  • Both use the only the hands (unless the necklace-maker or knitter is extraordinarily talented with his or her feet)
  • Both create some kind of wearable output
  • Both can be extremely simple or extraordinarily complex.
  • Both have somewhat gendered associations

Making macaroni jewelry should stimulate group conversation because it’s an easy, repetitive activity that won’t be distracting. Like knitting, (and unlike origami), the participants can choose to create a pattern or choose pasta-beads at random. They can also draw inspiration from other group members.

Improving on Knitting?
Greer mentions her annoyance at strangers who pester her with questions about knitting, even though they don’t know how to knit and have no intention of learning.# Although knitting only requires knowing two stitches, if you don’t know them, knitting is closed off. It’s not the type of activity you can pick up easily just by watching. Passers-by could join in a drum circle without much prior bongo experience, but they couldn’t jump into a knitting circle. They could, however, make macaroni necklaces quite easily.

While members of a knitting circle bring their own yarn, patterns, and supplies, the materials for macaroni necklaces are communal, which should lead to more interaction. In fact, the group could make one macaroni necklace, with one person at a time choosing and stringing a bead (it would be tedious, but possible). Knitting simply cannot be done by more than one person.